As an Amazon Associate, we earn from qualifying purchases. Some links on this site are affiliate links at no extra cost to you. Our recommendations are based on thorough research and editorial judgment.

Heat Styling Tools 101: Straighteners, Curling Wands, and Hot Brushes Explained
When it comes to heat styling tools, we’ve got a solid game plan! Straighteners give you that sleek look, while curling wands release gorgeous waves. Hot brushes? They’re perfect for quick styling and a smooth finish. Always remember to use a heat protectant and section your hair—it’ll make things so much easier! Plus, a little practice goes a long way. If you’re excited to learn the tricks of the trade, we’re just getting started!
Key Takeaways
- Straighteners use ceramic or tourmaline plates for even heat distribution, sectioning hair for effective straightening.
- Curling wands come in various barrel sizes for different curl types; smaller barrels create tight spirals, larger ones create loose waves.
- Hot brushes combine the functions of straightening and brushing, suitable for quick styling on dry hair with adjustable heat settings.
- Always apply heat protectant before using any heat styling tool to minimize damage and ensure hair health.
- Proper maintenance of styling tools, like cleaning and safe storage, prolongs their life and effectiveness.
Understanding Straighteners: The Secret to Sleek Styles

You may be interested


Straighteners are like our trusty pals when it comes to getting that silky, straight hair we all love! They work wonders with their ceramic or tourmaline plates, which help heat get evenly distributed. This means less damage to our hair—pretty great, right? Just remember, before you turn on your straightener, always spritz on a heat protectant spray. It’s essential for keeping your strands safe!
Now, when you’re ready to straighten, start by sectioning your hair. Grab your straightener and glide it down from your roots to the ends, taking your time with each section. For instance, instead of yanking it down quickly, move slowly and smoothly. This helps give you that polished finish we all want. Patience really pays off here; trust me, going fast can actually lead to frizz and burn.
Once you get the hang of it, you’ll find that straightening can be a breeze! Plus, you’ll be the go-to person for tips on sleek hair. Now, let’s talk about how to maintain that straight look all day long! Using damage-free hair ties can help preserve your hairstyle without causing breakage or pulling.
Recommended Products

🌟【HAIR STRAIGHTENER AND CURLER 2 IN 1】Our straightener adopts advanced PTC heating technology, and ANGENIL focuses on women's hairdressing, which can quickly and easily create professional salon level styling. It has 11 levels of adjustable fine temperature ranging from 250 ° F to 450 ° F, which can intelligently maintain a constant high temperature, protect hair from damage, and enhance the natural luster of hair

VERSATILE FLAT IRON: This hairstyling iron reaches up to 410°F in 30 seconds for optimal styling, catering to sleek straight hair or bouncy curls. Its curved floating plates ensure better grip, enabling a smooth glide without snagging or pulling.
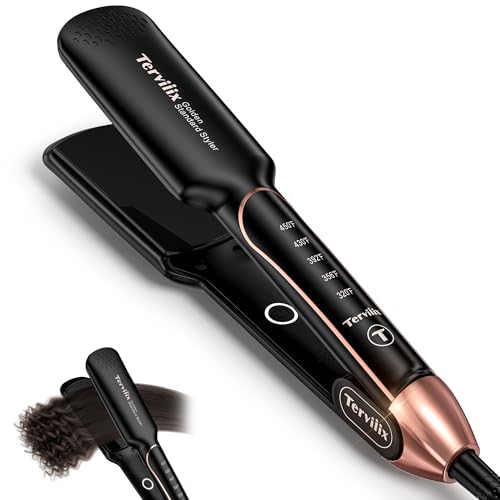
AKT CERAMIC TECH.:Terviiix ceramic flat iron is infused with argan oil, keratin & tourmaline to nourish your hair while styling, quickly concentrates heat, reducing thermal damage and leading to long-lasting results
Mastering Curling Irons: Creating Beautiful Curls

Hey there! Let’s chat about curling irons and how to create those gorgeous, bouncy curls we all love. First things first: always start with a heat protectant! Think of it like applying sunscreen to your hair before hitting the beach—it keeps those luscious locks safe from heat damage.
Now, when you pick up your curling iron, you’ve got to consider the barrel size. If you want tight, bouncy spirals, a smaller barrel is your best friend. For those dreamy, beachy waves, go for a larger one. It’s all about what look you’re after!
To make the perfect curl, take small sections of hair and wrap them around the barrel, holding them in place for just a few seconds. I like to keep the heat setting to medium; it’s hot enough to create lasting curls without zapping the moisture from your hair.
Once you’re done curling, let those beautiful spirals cool before you gently run your fingers through them. This step is key; it helps achieve that soft, natural look that’s so appealing. Trust me, your curls will look full of life!
Now that we’ve mastered the art of curling, let’s explore some styling tips to keep those curls bouncy and beautiful all day long! Using styling tools with adjustable heat settings is essential to protect your hair and achieve the best results.
Recommended Products

TIGHT CURLS THAT LAST: This double ceramic curling iron heats up fast and delivers even heat for tight spirals, defined ringlets, and frizz-free shine on fine to thick hair, with all-day hold on short to medium styles—even in humidity.

CLASSIC CURLS, LASTING HOLD: This 1-inch double ceramic curling iron heats up fast and delivers even heat for defined curls, loose beach waves, and frizz-free shine on fine to coarse hair, with smooth results that hold—even in humid weather.

CREATE TIGHT CURLS & DEFINED RINGLETS — The 3/4-inch barrel is ideal for creating spiral curls, ringlets, and defined waves on short and medium-length hair. It can also be used on long hair to create tighter curl patterns and long-lasting definition.
Blow Dryers: Tools for Volume and Shine

Hey there! So, if you’re looking to step up your hair game, a solid blow dryer is your best friend. Not only does it help cut down on drying time, but it also keeps your hair from frying by reducing the amount of heat it gets exposed to. Just remember to spritz on some heat protectant spray before you even plug in that blow dryer to keep your strands safe!
Here’s a quick tip: if you attach a concentrator nozzle to your blow dryer, it allows you to focus the airflow exactly where you need it the most. This gives you way more control over your styling. And don’t forget to grab a round brush while you’re at it! It’s perfect for lifting your hair at the roots and adding that fabulous volume we all love.
And here’s a finishing move you won’t want to skip: a blast of cool air at the end. It helps seal your hair cuticles, really boosting that shine and giving you that polished look. So, are you ready to blow dry your way to gorgeous hair? It’s all about those little steps to achieve that salon-fresh finish! Many professional dryers use ionic technology to reduce frizz and speed up drying, which can really improve your results.
Recommended Products

2x Faster Drying: Powered by a robust 1875W motor and advanced aerodynamic design, this ionic hair dryer delivers high-speed airflow to dry your hair twice as fast. Spend less time drying, avoid overheating, and minimize damage—all while achieving effortlessly sleek results.

2x Faster Drying: Powered by a robust 1875W motor and advanced aerodynamic design, this ionic hair dryer delivers high-speed airflow to dry your hair twice as fast. Spend less time drying, avoid overheating, and minimize damage—all while achieving effortlessly sleek results

Shinier, Healthier Blowouts: Infrared Heat Technology taps into natural moisture to prevent over‑drying and boost shine for salon‑quality results with this infrared hair dryer
The Rise of Hot Brushes: Effortless Styling Solutions
Hey, have you heard about hot brushes? They’re like the perfect blend of a straightener and a brush, and they really do make styling your hair a breeze! With their nifty bristle technology, you can smooth out your hair and style it all at once, which means less time fussing in front of the mirror.
You can use these hot brushes on dry hair to create all sorts of looks—whether you want sleek and straight strands or soft waves. Plus, if you’re aiming for a bit of extra volume, they can handle that too! The best part? These brushes usually have adjustable heat settings, so you can pick the right temperature that works for your hair type, which is awesome for keeping your locks healthy.
And let’s talk about how light they are! You can just glide through your hair without feeling like you’re lifting weights. No more bad hair days when you have one of these in your arsenal. Using tools with ergonomic handles can make styling even more comfortable for longer periods.
So, if you’re curious about finding a styling routine that’s both efficient and fun, hot brushes could be worth checking out!
Now, let’s explore how to choose the right hot brush for your specific hair type!
Recommended Products

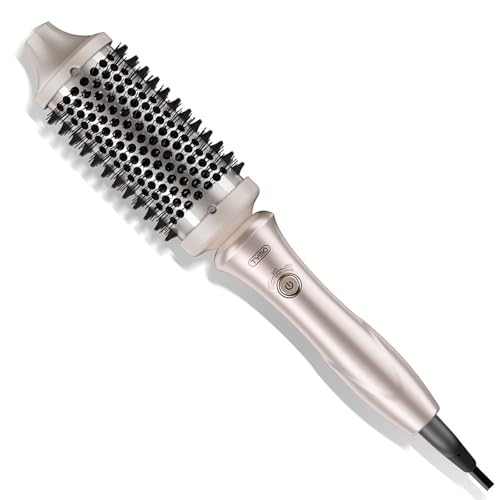
Create Voluminous Styles: Wavytalk 1.5 inch thermal brush with tourmaline ceramic barrel ensures even heat distribution, crafting medium to loose curls and waves; Achieve immense volume and unleash an explosion of style. Perfect curls await with our thermal hair brush

A CURLING IRON & ROUND BRUSH IN ONE – FOR DRY HAIR ONLY Designed for use only on dry hair, this heated styling brush combines the smooth finish of a round brush with the lift, curl, and shape of a curling iron. Add volume, create waves, flip ends, or style bangs—no blow dryer needed.
UPGRADED BRISTLES: The TYMO STYLUX 1.7-inch thermal brush features upgraded Flexi-Fit Tech. Its adjustable nylon bristles minimize hair pulling, allowing the brush to glide through hair effortlessly. The staggered bristle design ensures even hair distribution around the barrel, which optimizes heat application and provides a secure hold for styling. For added safety, the brush is equipped with a 30-minute auto shut-off function. [Please note: TYMO thermal brush is NOT a hair dryer brush.]
Crimpers: Adding Texture and Volume
Hey there! So, if you’re looking to add some texture and volume to your hair, crimpers are the way to go. Start by working in small sections, beginning at the roots. Just grab a section of hair, clamp the crimper down, and gently slide it down the hair shaft. This will help you create those beautiful, defined waves we all love.
What’s really cool is that these crimped styles can stick around for days! If you want to help those waves last even longer, just give your hair a quick spritz with some lightweight hairspray. For example, I love using a flexible hold spray that keeps my waves bouncy without feeling crunchy. So grab your crimper and get ready to add some flair to your hair! It’s such a fun way to switch things up.
To keep your tools in great shape and ensure long-term performance, always clean and store them properly after use.
Once you’ve got the hang of crimping, you might want to explore some hairstyle variations to keep things fresh!
Choosing the Right Tool for Your Hair Type
Finding the right heat styling tool for your hair type can feel like a bit of a treasure hunt, but it’s totally worth it! If you have fine or thin hair, you’ll want to keep that straightener or curling wand at a lower temperature, around 300°F. Trust me, your hair will thank you for avoiding those crispy strands.
On the flip side, if your hair is thick or coarse, don’t be shy—crank it up to about 400°F. Just make sure to look for tools with adjustable settings so you can find the perfect heat level for your locks. And if frizz is your nemesis, opt for tools with ceramic or tourmaline plates; they help keep that pesky frizz in check and give you a smooth finish.
Now, when it comes to curling, barrel size matters! Use a small barrel for tight curls and a larger one for those effortless, loose waves. And always, always remember your heat protectant—it’s like a shield for your hair to keep it safe from heat damage. With these tips in mind, you’re ready to style your hair like a pro! Now, let’s chat about some fabulous styling techniques that will keep your look fresh and vibrant.
For the best results, consider choosing a clipless curling iron design, which provides greater styling versatility and reduces hair damage.
Recommended Products

SALON-QUALITY CURLS: Tourmaline ceramic barrel distributes heat evenly to create smooth, shiny curls and waves that last while reducing frizz and static for a polished finish.

SOFT WAVES, LASTING CURLS, ALL-DAY HOLD: The Double Ceramic 1½-inch barrel creates soft waves, loose curls, and polished volume on medium, long, fine, or thick hair, while even ceramic heat helps eliminate hot spots for smooth, long-lasting results with less damage.

【The Dazzling Tighter Curls or Beach Wave Last Long】 ORYNNE O-Curl Series 3/4 inch curling iron is the perfect size curler for achieving 𝐭𝐢𝐠𝐡𝐭𝐞𝐫 𝐝𝐞𝐟𝐢𝐧𝐞𝐝 𝐜𝐮𝐫𝐥 𝐨𝐫 𝐛𝐞𝐚𝐜𝐡 𝐰𝐚𝐯𝐞. Tourmaline 𝐜𝐞𝐫𝐚𝐦𝐢𝐜 barrel distribute heat evenly and ensures an ultra 𝐬𝐦𝐨𝐨𝐭𝐡 𝐠𝐥𝐢𝐝𝐞 on hair with less friction and damage. Super 𝐞𝐚𝐬𝐲 𝐭𝐨 𝐮𝐬𝐞
Preparing Your Hair for Heat Styling
Hey there! Let’s chat about preparing your hair for heat styling, because a little prep goes a long way. First things first—detangling is super important! You want to brush out any knots and tangles, so your hair stays smooth while you style. For example, using a wide-tooth comb can be really gentle on your strands, especially when your hair is wet.
Next up, sectioning your hair can make the whole process way easier. Grab some clips and divide your hair into manageable parts. This way, you can focus on one section at a time, ensuring that each strand gets the attention it deserves. Plus, if you apply a bit of mousse or styling spray to each section, your curls or waves will hold better and last longer throughout the day. Using tools designed to promote scalp and hair health, like a derma stamp for hair, can also enhance your hair care routine.
Techniques for Curling Hair With Straighteners
Hey there! So, you’re interested in curling your hair with straighteners, huh? It’s actually a pretty neat trick once you get the hang of it. First off, always start with clean and dry hair. And trust me, don’t forget that heat protectant! Your hair will thank you for keeping it safe from the heat damage.
Next, think about where you’re positioning the straightener. If you want those bouncy, high-volume curls, start near your scalp. Grab a section of hair, wrap it around the plates, and give it a little twist—almost like you’re turning the straightener 180 degrees. For example, if you want a tighter curl, use smaller sections of hair; if you’re aiming for loose waves, go bigger! It’s all about finding what works best for you.
Oh, and a quick tip about angle: when you’re curling, rotate the straightener away from your face. This will help create a more natural look that doesn’t scream “I curled my hair!” After you get comfortable with these basics, you’ll feel more confident in experimenting with different styles. So, are you ready to start curling? Let’s get creative with those locks!
To achieve consistent results, consider using a tool with adjustable heat settings that match your hair type.
Waving Hair: A Step-by-Step Guide
Creating beautiful waves with a straightener can really transform your hair routine! So, let’s break it down step-by-step, shall we? Start off with dry, detangled hair. It’s best to section your hair into 1-2 inch parts; this makes it easier to manage and helps the heat distribute evenly.
Now, grab your straightener and position it close to your roots. Give it a little twist in a ‘C’ shape, then pull it down and twist again to form an ‘S’. This method of alternating directions is key—it helps to create those soft, natural-looking waves. Hold each section for just a few seconds. If you want to try different section sizes, go for it! Just remember that larger sections can give you looser waves while smaller sections create tighter curls.
Once you’ve waved all your hair, finish off with a lightweight hairspray to keep those waves in place, and don’t forget to add a touch of shine serum for that gorgeous, glossy look. Trust me, you’ll feel like you just stepped out of a salon! Now let’s chat about styling tips that can take your waves to the next level.
Be sure to choose a flat iron with precision temperature control to protect your hair from damage while achieving your desired style.
Finishing Touches for Perfect Curls and Waves
When you’re trying to achieve those picture-perfect curls and waves, it’s really all in the finishing touches! We all dream of having flawless hair, right? So let’s make sure to secure that style the right way.
First off, grab a lightweight hairspray. This is key because it holds your curls without that stiff or crunchy feeling that we all want to avoid. You want your hair to move and look natural, not like a helmet, right?
Next, instead of reaching for a brush—which can disrupt those lovely curls—try gently running your fingers through your hair. This helps maintain your curls’ definition while giving them a soft, bouncy finish. Think of it like teasing your hair affectionately instead of combing through it.
For that polished touch, using a little shine serum or oil like Magical Remedy really combats frizz and amps up the luster, making your curls shine. Plus, if you want to keep those curls intact while they cool down, pinning them up with a few bobby pins can work wonders. After all, who doesn’t want their waves to be as fabulous as possible?
Using styling tools with anti-tangle sensors and adjustable heat settings can also help protect your curls from damage while ensuring the perfect hold.
Now that we’ve covered the essentials for beautiful curls and waves, let’s move on to styling tips that can help you maintain that look throughout the day!
Maintenance and Care for Heat Styling Tools
Hey there! So, we all love those gorgeous curls and waves, right? But have you ever stopped to think about how to take care of the heat styling tools that give us those looks? Proper maintenance is super important!
First things first, always unplug your styling tools and let them cool down completely before you start cleaning. Use a damp cloth or an alcohol wipe to get rid of any product buildup—it works wonders! For instance, if you notice some hairspray residue on your curling wand, a quick wipe down will keep it performing at its best.
When it comes to storing your tools, try to avoid wrapping the cords too tightly. Instead, loosely curl them up to minimize fraying. It’s such a simple step that can prevent any shocking surprises later on! And don’t forget to keep your tools in a heat-resistant pouch to protect your surfaces. Regularly check for any signs of wear and tear because we want our tools to be safe and effective.
Best Practices for Protecting Your Hair During Styling
Hey there! So, let’s chat about styling your hair the right way. Styling in small sections is super important because it helps the heat spread evenly. Seriously, your hair will feel so much healthier for it! For instance, when curling your hair, try taking one-inch sections rather than going for large chunks. You’ll notice the difference in how well those curls hold.
Another tip? Let your hair cool completely after you finish styling. This little step is crucial if you want those curls to set or the straight strands to stay sleek. It’s like giving your hairstyle a little pause to really lock in the look.
Oh! And don’t forget to incorporate some deep conditioning masks into your hair care routine. Hydration is essential for keeping your locks shiny and soft. Try using a deep conditioner once a week—just slather it on and let it sit while you do your thing. It works wonders!
Now that we’ve covered styling and hydration, let’s move on to the fabulous world of choosing the right tools for your hair type!
Frequently Asked Questions
What Do Different Curling Barrels Do?
Different curling barrel sizes create varied curl styles, while barrel material types like ceramic or tourmaline enhance results. By customizing our approach, we can achieve everything from tight curls to loose waves effortlessly.
How to Use a Heat Styling Brush?
To use a heat styling brush, we’ll section our hair and select a suitable heat setting. By employing effective styling techniques, we’ll enjoy the brush benefits, achieving smoothness while boosting volume and shine.
What Is the Least Damaging Heat Tool for Hair?
We find hot brushes are the least damaging heat tools for hair. By using heat protection and selecting the right temperature for our hair types, we can guarantee effective styling while prioritizing damage prevention.
What Is the Best Tool to Curl Hair for Beginners?
For beginners, a curling wand with a larger barrel is the best choice. We should focus on safe heat options and remember curling wand tips, ensuring we practice slowly for beautiful, manageable curls without damaging our hair.